

“], “filter”: { “nextExceptions”: “img, blockquote, div”, “nextContainsExceptions”: “img, blockquote, a.btn, a.o-button”} }”>
Heading out the door? Learn this text on the brand new Outdoors+ app obtainable now on iOS gadgets for members!
>”,”title”:”in-content-cta”,”kind”:”hyperlink”}}”>Obtain the app.
If you ask virtually anybody what performs a major think about coming into arm steadiness poses, most individuals will say that balancing in your fingers comes with some emotional baggage. Specifically, intimidation. Others will title the fragile and disciplined balancing act of discovering simply the suitable muscular engagement and physique place to defy gravity.
Overcoming your worry and summoning the energy to attempt many times are important to making an attempt arm steadiness poses. However what many people overlook is figuring out how you can hold your wrists secure regardless of the large quantity of strain that outcomes from putting your whole weight on them.
The Anatomy of Your Wrists
Your wrists comprise a small portion of your physique however soak up an outsize quantity of depth in arm balancing poses. Regardless of their large utility, the wrists softer tissues of the wrist comprise largely ligaments and tendons and retinacula (fascia), not muscle tissues, explains Richelle Ricard, a Portland, Oregon-based yoga trainer and creator of The Yoga Engineer’s Guide: The Anatomy and Mechanics of a Sustainable Apply. These tiny networks hold your hand and forearm safely aligned as you go about your day.
Your wrists do share some muscle tissues along with your forearms. These permit for hand actions together with flexion (down), extension (up), adduction (towards the physique), and abduction (away from the physique).
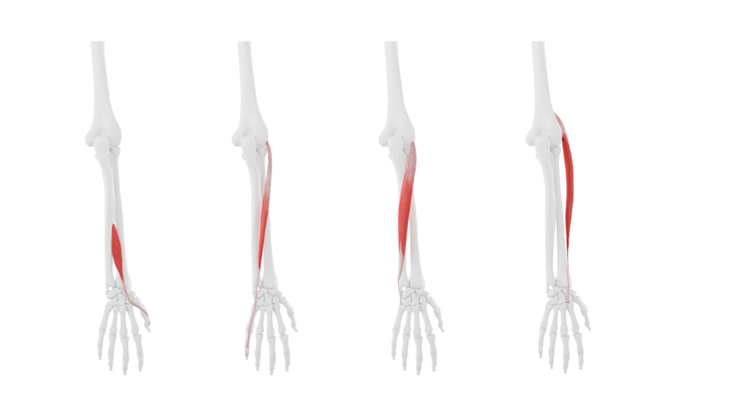
Nonetheless, these muscle tissues aren’t enough to help your physique weight throughout arm balances. How that strain is distributed among the many different buildings in your wrists is decided totally by the place you place and place your fingers, wrists, and forearms and the way you interact them. If you modify their placement, the strain in your wrists adjustments—as does your probability of pressure and overuse accidents.
“An excessive amount of strain on the bottom of the thumb will lead to compression or dysfunction,” says Ricard. “Weight ought to distribute by hand bones and into the bottom of index and center fingers. The thumb must be mild and near the hand, moderately than unfold out far.”
“Typically we’ll favor the heel of the hand or the skin of the hand, and even the within of the hand,” says Kristen Leal, a London-based yoga trainer and creator of MetaAnatomy: A Trendy Yogi’s Sensible Information to the Bodily and Energetic Anatomy of Your Wonderful Physique.
It’s not simply concerning the placement of your fingers however the way you interact them. These carpals that aren’t actually well-suited for weight-bearing, so spreading your fingers an ample quantity is important.
“Typically lecturers will say, unfold your fingers actually large. That may be simply as tense for the hand,” provides Leal. “So, you desire a regular human unfold of the fingers. It doesn’t must be a giant bear claw. That may be simply as bizarre as having a bit lobster hand.”
It’s additionally essential to have a sensible consciousness of your physique’s capabilities. This implies you might must adapt the pose in addition to your expectations for the way you come into it.
“It’s at all times fascinating to look at why a pose is essential to you,” says Leal. “There’s a thousand completely different very legitimate solutions to that, however that’s going to tell your method. If we’re seeking to nail a form or a sure aesthetic, relying on how our our bodies are linked and made, it could not favor that form. So we could have to change the form, adapt it to suit us,” says Leal.
“We would go slower, we may be working with the deconstructed fashions for some time,” explains Leal. “We would construct up very slowly to some semblance of that form, however it could not seem like the images look, which is ok.” By “deconstructed fashions,” Leal refers to creating the essential form of the pose in a supported vogue. For instance, attempting Flying Pigeon in your again. It might additionally imply practising Handstand on the wall or Scale Pose utilizing blocks.
Learn how to Prep Your Wrists for Arm Steadiness Poses
Usually stretching and strengthening your wrists might help ease your wrists deal with the strain of arm balances. So can following are some foundational practices to have interaction in as you apply arm balances.
If you take a studio or on-line yoga class, lecturers emphasize incremental wrist strengthening and stretching by taking your wrists by a gradual and secure warm-up earlier than putting your full physique weight on them in tougher poses. Don’t underestimate or skip these while you’re practising at house!
Begin with coming to your fingers and knees. “All fours is a good place to stretch the wrists, which [stretching] is important for wrist energy,” says Soozie Kinstler, a Denver-based yoga trainer and founding father of Jaiyoflow Yoga. You’ll generally hear lecturers suggest positioning your fingers in numerous methods than normal to stretch your wrists.
Begin by angling your fingers barely away from the middle of the mat, moderately than straight forward, and see how that feels. For a extra intense stretch, proceed to angle your fingers additional outward or pull a 180 and switch them towards your knees. You may also modulate the quantity of stretch not simply by the angle of your wrists however by leaning again or ahead barely to convey extra of your weight into your legs.
Different wrist warm-up poses embody:
Learn how to Apply 9 Frequent Arm Steadiness Poses and Not Wreck Your Wrists
Listed below are 9 not-so-common arm-balancing poses and insights on how one can safely incorporate them into your apply. In every occasion, you need to give attention to alignment moderately than drive, explains Ricard. “As an alternative of attempting to muscle your method by, take into consideration the place the angles on the wrist and the elbow and the shoulder are,” she says.
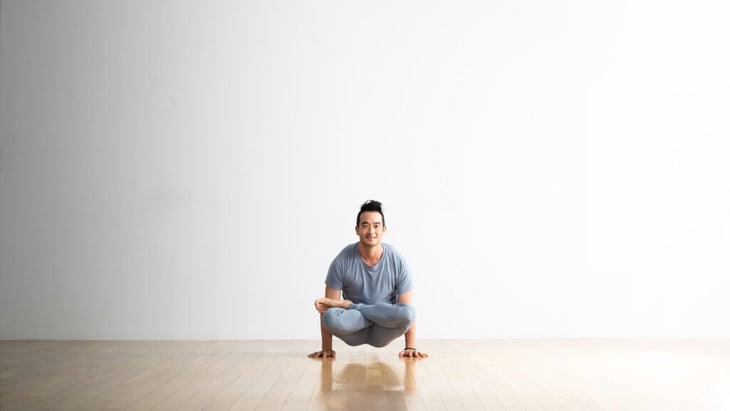
1. Scale Pose (Tolasana)
“Scale pose is a crucial posture should you’re seeking to do extra of the ashtanga vinyasa type of yoga, the place you’re transitioning your apply to leaping by or leaping again,” says Leal. “It’s going to be a helpful pose in your apply to assist with that transition and choreography.”
As you sit cross-legged or in Lotus Pose, your fingers come alongside your sit bones and roughly beneath your shoulders moderately than ahead or behind them. Additionally, attempt to carry your self straight up moderately than lean your chest and higher arms ahead.
Learn how to hold your wrists secure: For newbies, Kinstler recommends putting yoga block on the bottom stage beneath every hand to create some further leeway between your physique and the mat. Then it’s time to carry off. Attempt it with and with out blocks and see what’s extra comfy for you.
“Along with your ankles crossed, press the pinkie toe edges of your ft into the mat. Around the higher backbone and carry the pelvic ground to lift your hips,” Kinstler. Additionally, apply lifting one foot at a time first to stop an excessive amount of weight being positioned in your wrists directly.
RELATED: Learn how to Come Into Scale Pose
2. Firefly Pose (Titibasana)
In Firefly Pose, the inspiration that you simply’re constructing on is every part, explains Ricard. And that begins not along with your fingers however your hips.
Firefly is actually a wide-legged standing ahead fold, says Ricard. “The error folks make is that they’re attempting to get their arms in between their legs, so their fingers find yourself too shut collectively,” she explains. “So that you’ve received inside rotation on the shoulder, stress on the elbow, stress on the thumb facet of the wrist, after which hyperextension on high of it because the physique comes ahead over the hand.”
Earlier than you try the arm steadiness pose, you want sufficient flexibility within the hips and the hamstrings so you’ll be able to take your fingers large sufficient as you arrange for Firefly. That units your fingers up for correct alignment, which in flip permits for secure and supportive wrist perform.
Learn how to hold your wrists secure: As you attain between your legs, your fingers must land large sufficient, along with your fingers pointing barely outward. “It’s counterintuitive,” explains Ricard. “However wider turned-out fingers naturally flip the elbows in barely, so that you don’t must combat to squeeze your elbows in.”
When your fingers are positioned too shut collectively, your elbows are inclined to jut out and your shoulders aren’t aligned, which implies your chest muscle tissues must compensate as you try and help your physique weight. Likelihood is you’ll wrestle to search out the required carry.
“Whereas with the fingers large sufficient, that pure turnout occurring, it turns right into a perch that you simply simply sort of drop your hips a bit and your ft carry flippantly so long as your bandhas are speaking,” says Ricard.
RELATED: Learn how to Come Into Firefly Pose
3. Shoulder-Urgent Pose (Bhujapidasana)
A lot of your capacity to come back into Shoulder-Urgent Pose lies in your consideration to your hand placement. In the event that they’re too shut to 1 one other, Ricard explains, there could be pinch factors alongside the thumbs.
You additionally need to be careful for wrist hyperextension, which occurs when the again of your hand is pressured towards your forearm at a pointy angle. This angle makes it unimaginable on your wrist flexors to securely maintain your body weight. Experiment a bit and study precisely what hand placement works for you.
How-to hold your wrists secure: Ricard suggests putting your fingers so your wrist creases fall simply barely in entrance of your arms. That allows you to derive the utmost quantity of energy out of your forearms whereas retaining your steadiness.
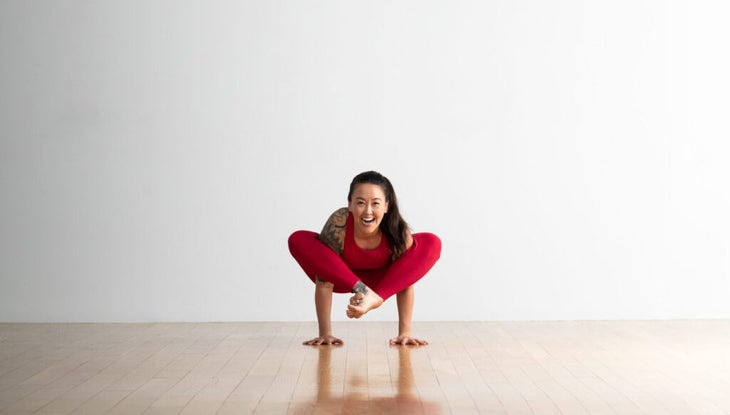
After you discover that place, it’s a matter of figuring out the place else in your physique to press to create the required muscular engagement. “Apply making the inside knee to outer shoulder contact,” says Kinstler, precisely like what you do in Squat (Malasana) or Crow Pose (Bakasana). “When your bum drops in your higher arms in Shoulder-Urgent Pose, press into your fingers and lengthen your sternum ahead. Begin by strolling your toes to the touch, and ultimately cross your ankles.”
Kinstler additionally suggests studying the pose with yoga blocks beneath your fingers. “Use two blocks with the heels of your fingers on the blocks and your fingers curling over the sting,” she says.
RELATED: Learn how to Come Into Shoulder-Urgent Pose
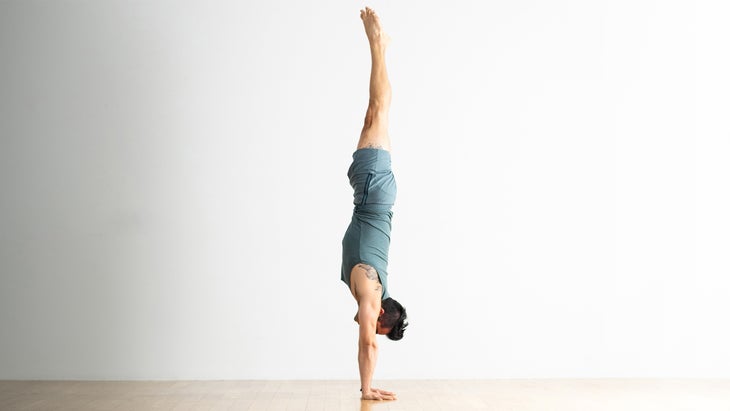
4. Handstand (Adho Mukha Vrksasana)
“Handstands are evocative of our childhood,” says Leal “ You do these items while you’re a child. You fearlessly fling your self upside-down in your fingers and also you scream.” She means that at the same time as adults, we apply Handstand in a method that’s evocative of being a toddler by being a bit extra curious and lots much less afraid of failure and falling.
Nonetheless, that doesn’t imply tossing warning out the window. You may convey a mature discernment to your Handstand apply by deconstructing the pose, being reasonable about your limits, and educating your physique how you can interact sure muscle teams in the best way the pose calls for earlier than you flip every part upside-down.
Learn how to hold your wrists secure: Of all of the cues that may set your wrists as much as be structurally sound in Handstand, Leal prefers telling college students to give attention to the crease on the entrance of your wrist while you place your fingers on the bottom. “I feel adjusting the outstanding wrinkle parallel to the entrance fringe of your mat tends to get much more anatomies in an advantageous place,” she says.
However don’t neglect about your wrists as soon as they’re in place. It may be difficult while you’re the wrong way up, however come again to what you already know and apply in Down Canine and Plank and press equally by all of your fingers and knuckles. Leal explains that it’s principally about constructing “consciousness, connection, and energy in and across the wrists.”
RELATED: Learn how to Come Into Handstand
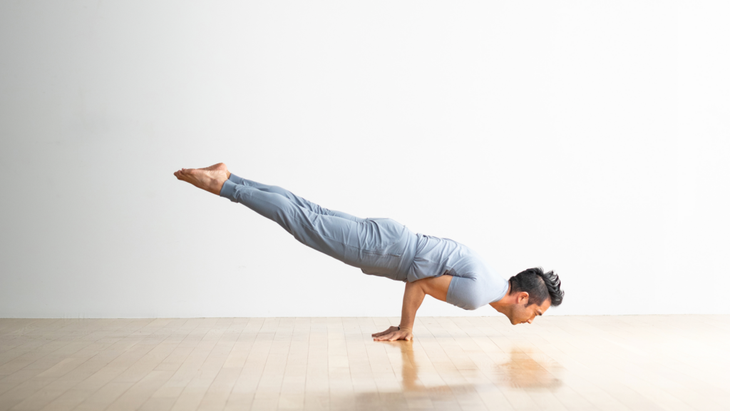
5. Peacock Pose (Mayurasana)
Ricard factors out that in pictures of Peacock, practitioners are very not often hyperextended within the wrist. As an alternative, the wrists and forearms kind a proper angle. The hand placement of the pose, wherein your fingers level again towards your knees, helps with this.
For Peacock prep, Ricard recommends practising Eagle Arms first to stretch the bottom of the shoulders and mimic the wanted engagement. “You’re externally rotating in each postures since you’re attempting to tuck these elbows beneath the ribs a bit for that balanced place,” she explains.
Learn how to hold your wrists secure: Place each fingers on the bottom, fingertips pointing towards your toes. Press into your palms and lean ahead, as you attempt to discover your steadiness level by equal distribution of weight in your fingers. “The steadiness level finally ends up a lot farther ahead than you assume will probably be. Despite the fact that the higher physique is heavier due to the size of the legs, there’s this fascinating dynamic [happening] within the teeter-totter.”
RELATED: Learn how to Come Into Peacock Pose
6. Aspect Crow (Parsva Bakasana)
When studying Aspect Crow, Ricard advises that when your fingers are positioned sufficiently large, the pose will really feel extra pure and produce you extra stability. The flexors of the forearms are at their longest on this place, which implies they’re not contracting or at their strongest. What outcomes is your skeletal system taking part in a bigger position in holding you in place by its angles and alignment.
Ricard additionally suggests putting ample power in your palms to assist hold your wrists mild.
Learn how to hold your wrists secure: Take your fingers at the very least shoulder-distance aside. As you lean your torso ahead and twist to the facet, hold your elbows aligned over your wrists moderately than leaning in entrance of them.
Just like coming into Firefly pose, Ricard explains, it’s essential to lean ahead slowly and activate your core. “The steadiness level goes to disclose itself should you transfer slowly, versus making an attempt to hop your ft off the earth unexpectedly,” she says.
RELATED: Learn how to Come Into Aspect Crow
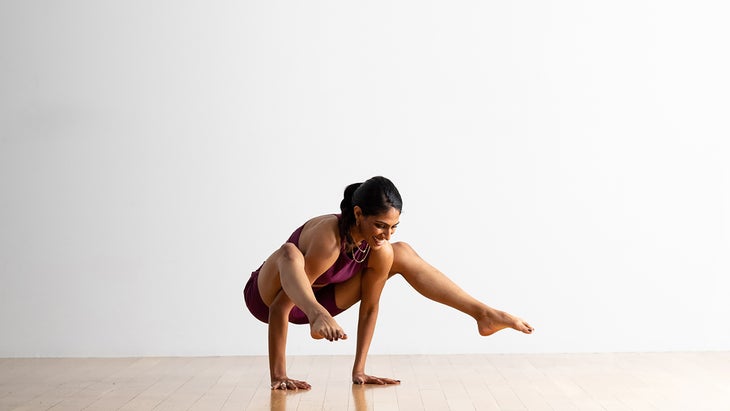
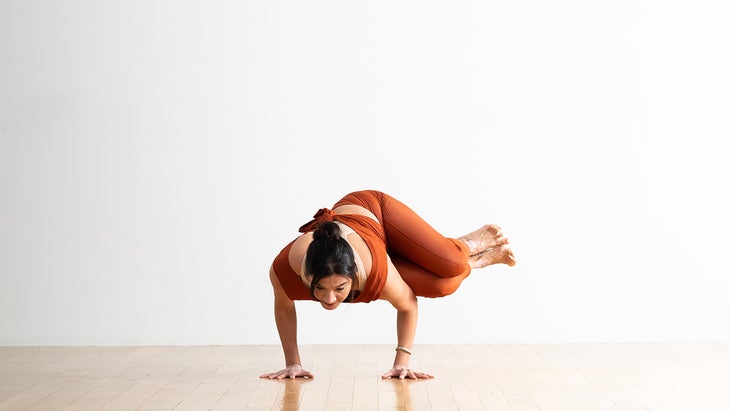
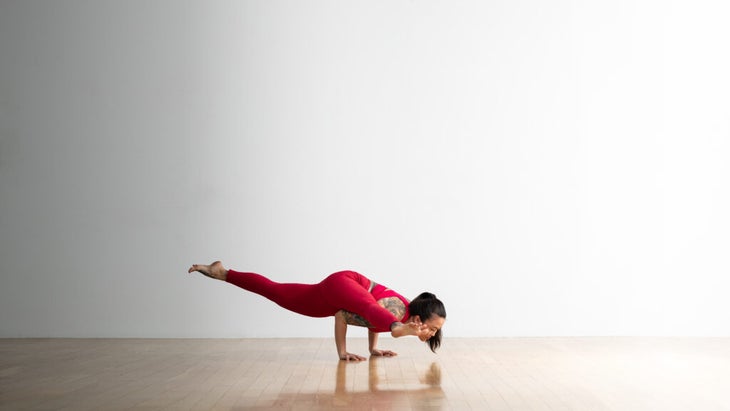
7. Eight Angle Pose (Astavakrasana)
Studying this pose could take a while, because it’s a fragile dance between balancing arm and core energy, leaning ahead and never face-planting, and figuring out what your legs are doing with out essentially taking a look at them.
Consider Eight Angle Pose as an embellishment of Aspect Crow. Each are core-intensive poses wherein your legs are off to the facet in one thing akin to a twist as you bend your elbows and decrease your torso like in Chaturanga. Squeezing your inside thighs round your arm might help interact muscle tissues that may create stability and assist with steadiness as you come into the pose, which may hold you from falling into habits that intensify the strain in your wrists.
Learn how to hold your wrists secure: Place blocks beneath your fingers to create additional area as you carry off the bottom. This will additionally hold your wrists from hyperextending, says Kinstler. She additionally suggests bringing the inside knee of your high leg to the again of your shoulder, such as you would in Shoulder-Urgent Pose, and clamp down for stability. If you carry your hips off the ground, discover your steadiness with out leaning thus far ahead that your forearms lean nearer to your fingers.
It takes some apply. What’s extra essential than lifting your legs off the ground is doing so with secure alignment that retains your wrists at a 90-degree angle moderately than permitting your forearms to study ahead, nearer to your fingers, in hyperextension.
RELATED: Learn how to Come Into Eight Angle Pose
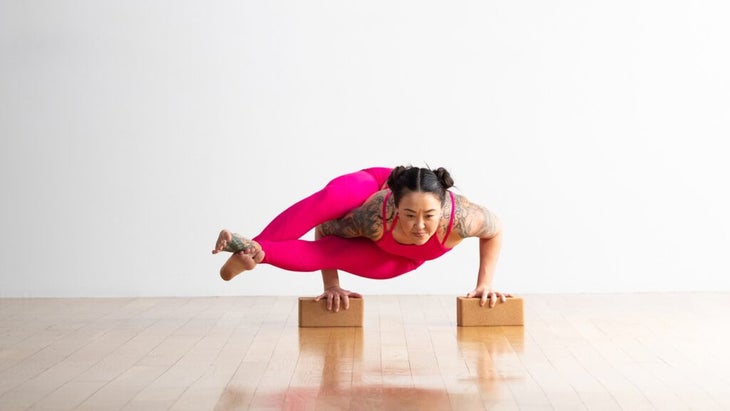
8. Eka Pada Koundinyasana
This arm steadiness additionally builds on Chaturanga, or low push-up, just like Aspect Crow and Eight Angle Pose. All the identical security precautions apply, together with specializing in alignment and taking your fingers sufficiently large.
You may enter Koundinyasana from a number of completely different poses, though attempt practising it from Lizard Pose so you’ll be able to hold that very same inside knee, outer shoulder engagement, says Kinstler. This engages your core and helps you discover your steadiness with no need to lean too far ahead, which may pressure the wrists.
Learn how to hold your wrists secure: Begin from Lizard Pose along with your again knee lifted. Carry your proper hand inside your proper foot along with your fingertips barely in again of your heel. Work the identical inner-knee, outer-shoulder relationship as Lizard, says Kinstler, wherein you’re urgent your knee into your shoulder and your shoulder into your knee.
As you bend your elbows and decrease your hips, you’ll be able to convey your proper elbow beneath your entrance hip crease for extra help, Kinstler provides. This minimizes pressure on the wrists. Over time, you’ll be able to study to hover with out that.
Deal with discovering your steadiness right here. Hold your again foot on the bottom and push by your again heel to have interaction your core muscle tissues and take a bit of the burden off your wrists. Attempt to hold your forearms at a proper angle along with your wrists. Ultimately, you’ll be able to carry your again leg and straighten your entrance leg. There’s no must rush the pose. In reality, getting your entrance leg to carry could take months and even years, says Kinstler.
RELATED: Learn how to Come Into Koundinyasana
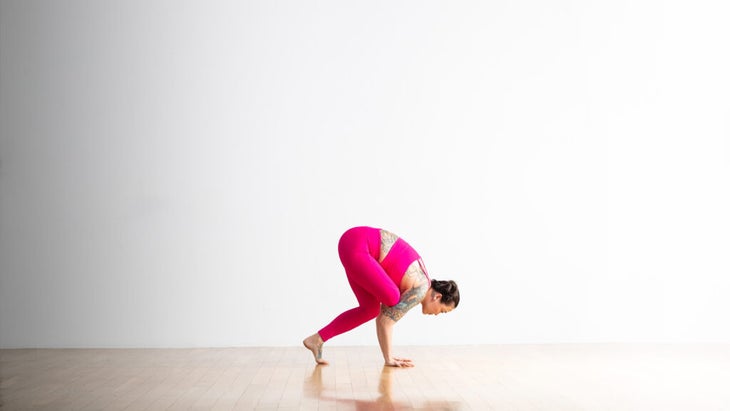
9. Flying Pigeon (Eka Pada Galavasana)
Leal explains that Flying Pigeon is yet one more arm steadiness that has the same structure to Chaturanga in that your chest is shifting ahead as your arms are shifting barely backward. Taking your fingers far sufficient aside and never leaning your forearms too far ahead are important.
Once more, you’ll be able to ease the depth in your wrists by creating energy and suppleness in different elements of the physique in addition to secure alignment of elbows over wrists. “Flying Pigeon requires a major quantity of hip mobility and suppleness, in addition to energy within the core and shoulders and arms,” says Leal.
Learn how to hold your wrists secure: To apply entering into this pose, Leal recommends attempting what she refers to as a “deconstructed model” of the pose to familiarize your self with the alignment and engagement of the pose. Begin by coming into the essential form of the pose whereas preserving your again foot on the ground, as within the picture above. Apply urgent your entrance knee into your higher arm, flexing your lifted foot, and taking Chaturanga arms as you slowly shift your self ahead and discover your steadiness whereas preserving a proper angle between your forearms and wrists.
One other deconstructed model of this pose is practising it dealing with away from a wall and urgent your lifted foot in opposition to it. Press in opposition to the wall along with your foot to have interaction the stabilizing muscle tissues all through your core, which may reduce the depth within the wrists.
RELATED: Learn how to Come Into Flying Pigeon